Wednesday, September 28, 2016

Spiced Couscous and Carrot Salad

After dropping my oldest son off at Middle school the other day, I noticed the houses that once showcased tired, brown lawns during our three year drought, miraculously had green lawns! 
Last I heard, we were still on water rationing here in SoCal, but these lawns were gorgeous! Green and landscaped to perfection. When did this happen? At first I thought it was because I was in a better neighborhood with much bigger lawns to notice, but as I turned down my very own block...I saw green lawns everywhere? I couldn't believe my eyes.
Unfortunately, I also noticed as I pulled into my driveway, that our house had the only brown lawn or shall I say, grass made of dirt...on the entire block! Hmmm...I don't believe I got the memo that said we can have nice lawns again. 
I'm embarrassed and determined to not have a yucky lawn anymore. But what do I do? There are those extremely dedicated folks doing their part to conserve, who opted for drought tolerant desert motif and even those who coughed up the mighty sum to get the new Astro-turf lawns, but I not going to do those things. No, I'm simply going to water my dirt again and hope something grows! :)
This recipe is a quick and delicious side dish that can be served warm or cold. As a salad, I wanted the carrots to be a little crunchy, so I steamed the carrots briefly, when I added them to the couscous while making the dressing. However, the next time I make it as a warm side dish, I'll coat the carrots with a little of the dressing and roast them in a 400 degree oven for a few minutes to caramelize them a bit for added sweetness. Either way this salad is delicious and decidedly fall-inspired! Enjoy!

Spiced Couscous and Carrot Salad

(recipe inspired by Happy Hearted Kitchen)
Serves 4-6

1 1/4 cups Trader Joe's® Harvest Grains Blend (substitute with Israeli Couscous)
1 3/4 cups chicken broth
1/2 t. cumin
1/2 t. coriander
1/4 t. ginger
1/8 t. cinnamon
1/2 t. kosher salt
1/4 t. red pepper flakes
1 bay leaf
3 carrots, peeled into ribbons
1/2 cup dried cranberries
1/4 cup pumpkin seeds, shelled
cilantro, garnish

Dressing
3 T canola oil
1 T Honey
juice and zest of one orange

In a large skillet, add chicken broth and spices and bring to a boil. Add couscous and cook according to package directions. Prepare carrot ribbons and add carrots to the skillet, placing the carrots on top of the cooked couscous. Replace lid and let carrots steam for 5-8 minutes. Prepare dressing. Add pumpkin seeds and cranberries to the couscous and carrots. Toss with dressing, add additional cranberries, pumpkin seeds to taste and garnish with cilantro and enjoy!


Other recipes to try:
Balsamic Mushroom Quinoa
Indian Spiced Lentils

Thursday, September 15, 2016

Spider Caviar

I have a real fear of spiders. Spiders creep me out. I squeal like a little girl when surprised by them. My nightmares are usually about spiders. When I was younger, in my 30's, I used to have a recurring nightmare about tons of spiders coming down all around me while I slept at night. I'd sit up in bed, yelling and swatting the spiders away...I seemed awake, but I was still very much asleep. This came much to the surprise of my husband when we first started dating. The first time it happened, he leap up out of bed, flipped on the light, ready to kill the spiders I was pointing at. As I woke up from my nightmare looking at my 'then' boyfriend in attack-ready sleepy confusion with a flashlight and a flat-soled shoe in hand. I was relieved as I realized it was a dream. I rolled over and said, "Sorry, I was just dreaming."  
He was so not happy to be standing and not sleeping. The good news is that he eventually got used to being startled awake by his arachnophobic girlfriend and he still married me. And luckily for me, I don't have that recurring spider dream anymore.

Knowing I hate spiders, I'm a little surprised that the three things I've purchased this year for Halloween are all spiders. I got this cute little dish pictured above from Ross Dress For Less. Then, I bought three wrought-iron spiders and a pair of spider earrings from Roger's Gardens Halloween Boutique. I like to think of it as therapy really. I'm desensitizing myself through retail therapy. Yeah, that's it. 

Anyway, my husband called this dish, Spider Caviar after he saw how I plated it and it stuck!  He said, "It looks like spider eggs...what's that fancy fish eggs stuff called?"  
It's super easy to make and super delicious with a garlicky olive flavor. It can be made any time of year not just for Halloween. Enjoy!

Spider Caviar (Mixed Olive Tapenade)

Makes ~1 cup

2 cups olives (I used a mix of black and green olives)
2 T capers
2 T sun dried tomatoes
2 cloves of garlic
1/4 cup basil, fresh
1 t oregano, dried
1 t lemon juice
fresh ground pepper
1/4 cup olive oil

Sliced Bread Points

Add all ingredients to a food processor and puree. Refrigerate until ready to use.
Serve with fresh baguette slices.

I made this tapenade originally to roll it into some fun Halloween inspired tortilla roll-ups or pinwheels using extra large orange tortillas. My idea was to add the black (tapenade) and some orange colored veggies and roll it up for a really cool looking Halloween colored appetizer. The roll ups I ended up making were so delicious with the tapenade, prosciutto, cream cheese, roasted red peppers, basil and crunchy red cabbage that they ended up looking more like a rainbow than my original idea of a black and orange pinwheels. And the photos turned out so gorgeous that I wasn't sure if the pinwheels were Halloween-ish enough...So instead of making these roll-ups it's own blog, I've included them below as a bonus recipe to the tapenade. Enjoy!


Halloween Roll-ups

Makes 14-16 slices

2 extra large orange tortillas
1 package cream cheese
8 slices of prosciutto
12-14 fresh basil leaves
2 T Roasted Red Peppers, thinly sliced
Red Cabbage, thinly sliced
1 T Spider Caviar (Mixed Olive Tapenade)  
  
Using a butter knife, spread about 1/8" layer of cream cheese to the tortilla, make sure to cover the whole tortilla up to the edges. Starting on one side of the tortilla, place a thin row of red cabbage. Leave about a half an inch of space between each ingredient. Next place 6-7 leaves of basil in a line next to the cabbage. Then add 4 slices of prosciutto followed by the bell peppers and then add a narrow line of the tapenade. Now you're ready to roll...Starting at the tapenade side, begin rolling tortilla until tightly rolled. Use additional cream cheese to secure the end of the tortilla to the roll as needed. Cut into 8 slices and serve. Repeat with the other tortilla. Enjoy!

Other Halloween dishes to try: click here

Thursday, September 1, 2016

Auntie Dianne's Pea Salad

As summer winds down and the kids head back to school, I can't help but feel a little sad that the long hot days of summer are a thing of the past. Another summer is in the books, so to speak. Our fun memories were made and forever imprinted in our minds. So why do I feel sad? I should feel great, because the kids are back in school and they love it so far! I should feel great because we're right on the cusp of my favorite season, FALL! 
Maybe sad isn't the right word, but more like regretful because it's an ending. When summer comes to an end, I always feel a little regretful because I think, maybe I didn't do enough with my kids this summer. Maybe I didn't enjoy it as much as I should have. Maybe I was too preoccupied with other things to really live in the moment...to feel grateful and at peace. I certainly didn't do all that I had planned to do this summer, but as I'm turning 47 next week, I know all too well that, time waits for no one. Anyway, I need to let go of all this regretful thinking and realize I did all I could this summer and that is enough and that is okay.
I decided to end my summer recipes with my Auntie Dianne's Pea Salad. It is simple and super delicious and can be made a day ahead for your Labor Day weekend BBQ. My aunt usually serves this in a large glass salad bowl, but I thought it would be fun to layer them and serve in individual mason jars. Mix well before serving and enjoy! 
 

Auntie Dianne's Pea Salad

Serves 4
 
2 cups frozen baby peas,
3 stalks celery, chopped
4 green onions, chopped

salt/pepper (to taste)
1/4 t celery seeds
4 cups of iceberg lettuce (I used Romaine)
4 T lite mayonnaise, divided
1 cup cheddar or cheddar/jack cheese, shredded
8 slices bacon, cooked and crumbled 

In a medium bowl, combine peas, celery, green onions, salt and pepper and mix together. 
Layer in mason jars or in a glass salad bowl.

1. Add about 1/2 cup of the pea mixture to the bottom of a mason jar. Sprinkle some celery seeds over top. 

2. Layer about 1 cup Romaine lettuce on top of pea mixture.
3. Spoon about 1 T of mayonnaise on top of lettuce layer.

4. Using the back of a small spoon, carefully spread mayonnaise on top of lettuce as if icing a cake.
5. Sprinkle and cover mayonnaise with 1/4 cup cheddar or cheddar/jack cheese.
6. Sprinkle top with crumbled bacon.
 

Place lids on Mason Jars and chill until ready to eat. Toss when ready to eat. 


Other Salads to try:
        
Summer Fruit Salad with Ginger and Lime
Zucchini Ribbon Summer Salad

Monday, August 22, 2016

Michelada Pops

The idea for these Michelada Pops came from last Saturday's preseason Rams game. While standing in the beer line, I noticed a woman carrying a beer and a tomato-colored popsicle wrapped in plastic. Then I overheard her say it was a Michelada. 
Whoa! Wait just a minute? A Popsicle Michelada! ...what a genius idea! 
Where can I get one of those? Sure enough, the vendor to the right of us was selling beer with flavored popsicle chasers! They had about 5 different flavors of pops. 
I thought...I SO HAVE TO MAKE THESE AT HOME!
The next day, I picked up some V8® and peppers and this is what I came up with. I like spicy food and since I'm not much of a beer drinker, the spicier the Michelada the better. I added sliced Serrano peppers with the seeds and the yellow wax peppers just to give it that extra heat. Green onions aren't your typical ingredient for Micheladas, but I love the pop of pretty green. Plus it just looks way cool sticking out of the Pops as a edible popsicle stick.
Feel free to experiment with different flavors, like Habanero and mango; olives, pepper, and worcestershire sauce; or omit the spice all together and make a typical Michelada of tomato juice, lime and salt. Add other ingredients like soy, teriyaki sauces, radishes and celery...the sky's the limit!  Salud!


Michelada Pops

Makes 8 

4 cans of V8® Vegetable Juice
1-2 Serrano chilies, sliced
1 yellow pepper, sliced seeds removed
2-3 limes, juice and lime slices
8 green onions, trimmed
Tajin® Classic Seasoning

8 bottles Mexican Beer

Slice Serrano chilies and drop a few of them into the bottom of each mold. Squeeze half a lime and 1/4 tsp of Tajin® seasoning into each mold. Fill to about 1/4 inch of the top with V8® vegetable juice. Add green onion into the mold and thread a yellow pepper ring over the green tops until it sits on top of the V8® juice. The yellow pepper ring acts to stabilize the green onion while the pops freeze. Place pops in freezer for 4-5 hours or until pops are set. Rim the glass with Tajin® and fill glass with your favorite beer and drop a Michelada Pop in and let it cool and flavor your beer. The longer it sits the spicier it will get. Add more lime as needed. Enjoy! 
Other recipes to try:
Pork Verde Stew
Zucchini Enchiladas
Vegetable Ceviche
        

Monday, August 15, 2016

Night Crawlers con Funghi

When I was a little girl, I loved to play in the dirt. I loved the smell of dirt, and much to the horror of my parents, I even liked the taste of dirt as I frequently sucked on rocks to get them clean. I know...pretty strange kid huh? My parents are probably surprised that I didn't die of trench mouth. 
One summer at my Grandma's house, my brother, sister and I got the hose and flooded her flowerbed and got nice and muddy making mud pies. We made dozens of pies loaded with sticks and grassy weeds popping from the gooey masses. We added a sprinkle of dirt on some and dried leaves on others. We uncovered earthworms and added them in the pies. Occasionally a worm or two were sacrificed as they tried to wiggle free from the mud pie. I remember feeling happy as we worked with a surprising amount of cooperation. We rarely did anything together that didn't involve arguing or eventual tears. Apparently, making a mess together builds teamwork. We eagerly lined up our mud pie masterpieces on sunlit patches of grass to dry. We were so proud of ourselves as we looked at the fruits of our labor... "Let's show Grandma!"
We didn't go far to find her because Grandma found us. Our excitement faded quick. The shock and horror on her face obvious as she looked at the mess we made of her flowerbeds...No more mud pies! 


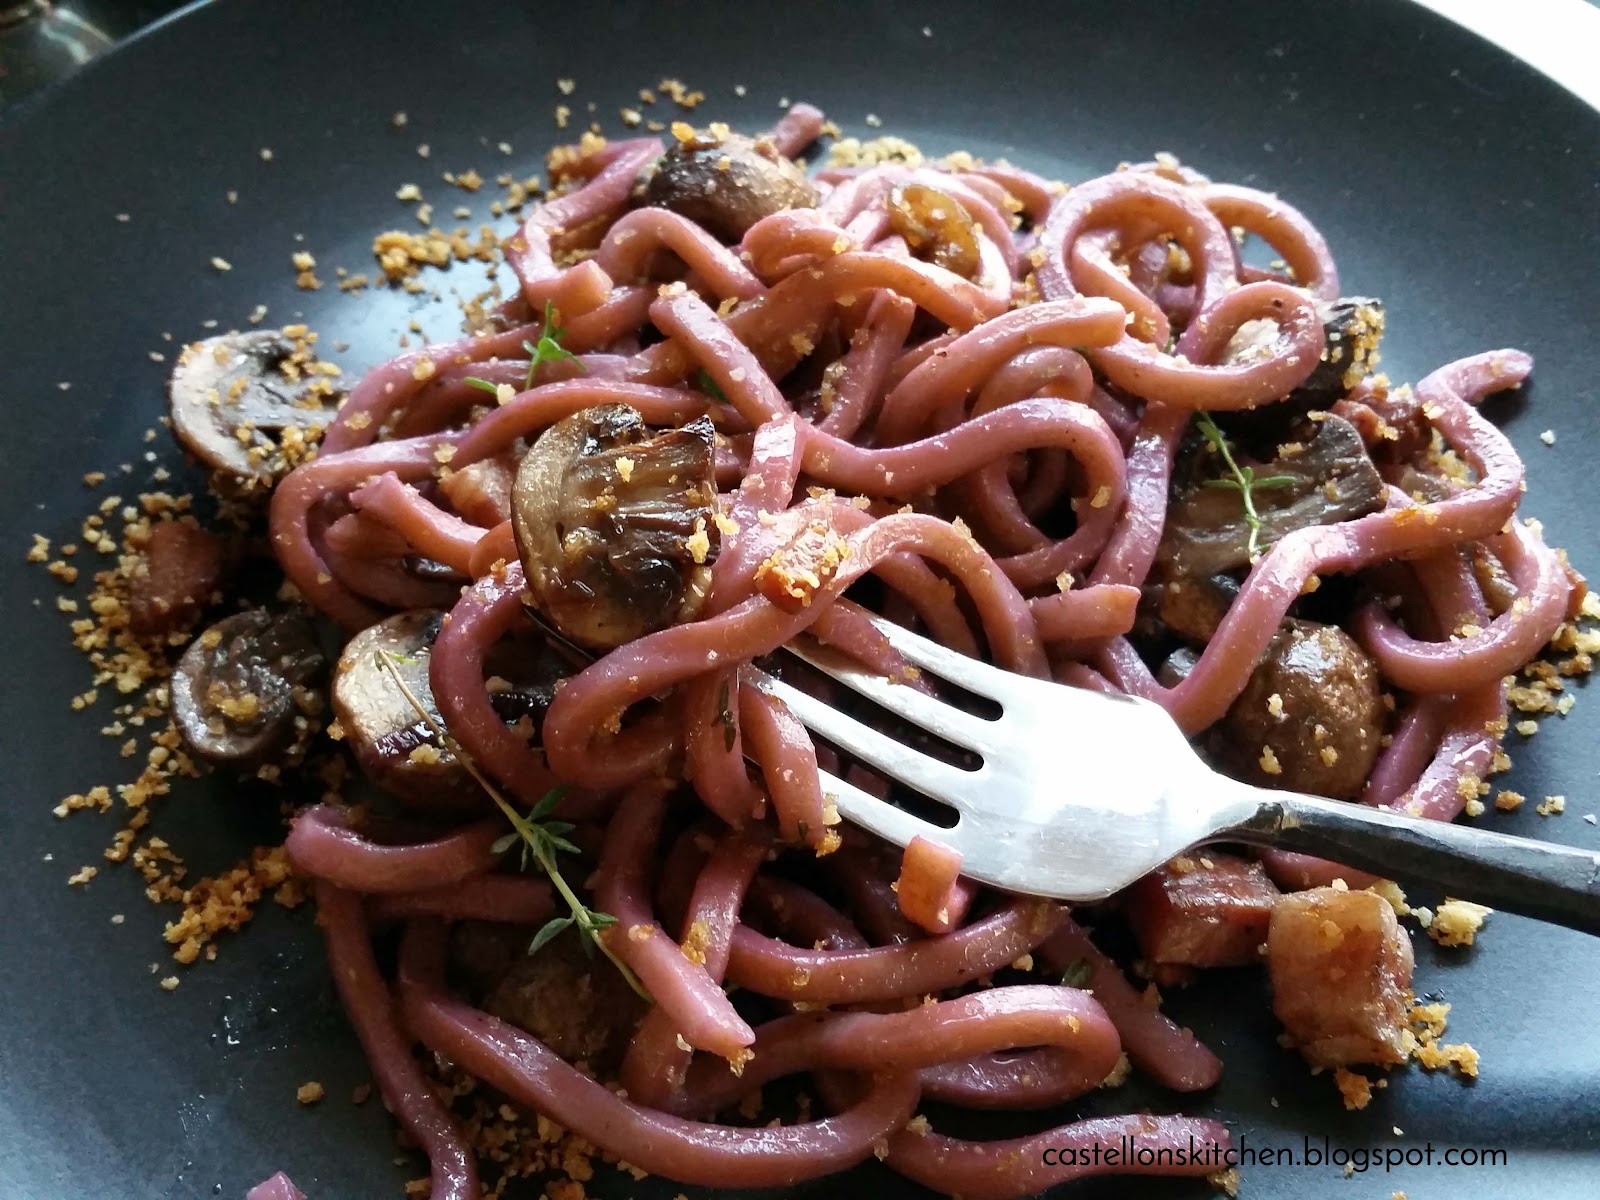
Obviously we got in trouble, but we sure had fun doing it. It was worth the trouble. I still like playing in the dirt when I go out to garden and thankfully I gave up sucking rocks. Inspiration for this dish came from making mud pies and playing with worms. Nightcrawlers con Funghi is a fun Halloween dish that's hearty and packed with savory flavor from the sauteed pancetta, onions, garlic, and mushrooms tossed with rosy-hued Udon noodles and toasted garlic breadcrumbs...It is so delicious! (I'm eating leftovers as I write this!) 
Imagine the fun you can have plating this dish at your next Halloween party. Serve it in large flower pots with shovel serving spoons or serve individual plates on a garden trowels spilling over onto dirt breadcrumbs, like I did below. Serve it warm or room temperature. Either way, it is simply delicious! Happy Halloween!


Night Crawlers con Funghi (Noodles with Mushrooms and Pancetta)

Serves 4

1 small onion, sliced
5 oz. Pancetta, diced
4 cloves garlic, thinly sliced
2-3 cups baby Bella mushrooms, halved
1 T olive oil
1 T butter
1 t fresh thyme leaves
salt and pepper (to taste)

2 packages Udon Noodles
1/4 t each orange and purple gel food coloring

1 cup Panko Bread Crumbs
1 T butter
1 t garlic powder

Breadcrumbs
Melt 1T butter in a small skillet over medium high heat. Add panko bread crumbs and garlic powder and toast breadcrumbs until they are a dark brown, stirring frequently to ensure they don't burn. Set aside.
Mushroom/Pancetta Mixture
Add butter and olive oil to large skillet over medium high heat. Add onions, mushrooms and pancetta and saute for about 10 minutes. Add garlic and thyme leaves and continue to saute until pancetta and onions are browned, and mushrooms are cooked to desired tenderness. About 10-15 minutes more. Add  salt and pepper to taste. Turn off heat and set aside.
Udon Noodles
In a small bowl add 3-4 cups water and add approximately 1/4 t. each of orange and purple gel food coloring and whisk until dissolved and the water is an orange-brown color. Transfer water into a saucepan and add Udon noodles. Let noodles sit for about 10-15 minutes to color the noodles. Once desired color is achieved, cook the noodles according to package directions and drain. Add noodles to skillet with mushrooms and pancetta and stir fry until noodles are coated. Top with additional thyme leaves and breadcrumbs and Enjoy!


Other Halloween Main Dishes to try:
Love at First Bite Linguini                           Midnight Sushi                             Fiendish Fingers

Friday, August 12, 2016

Summer Corn and Red Quinoa Salad


This is one of those accidental throw together salads that I made last summer that turned into something really refreshing and summer wonderful.  I am a huge fan of Greek flavors...cucumbers, feta cheese, roasted red and Greek peppers...what's not to love, right? The brightness of the lemon zest really makes these ingredients sing and makes for a nice change of pace from your typical vinaigrette pasta salad. It goes very well with BBQ chicken, ribs, sandwiches, and even as a topper to your favorite mixed greens. 

Feel free to substitute with orzo pasta or another small pasta if you don't like quinoa. I like using quinoa because the small grains hold the dressing well and packs flavor in every bite, plus you get the added protein. Also if you are not a fan of pepperoncini substitute with green olives.  I used red quinoa for contrast in the photos so feel free to use your favorite. Happy Summer Days!  


Summer Corn and Red Quinoa Salad

Serves 8

1 cup quinoa, rinsed, prepared and cooled
1 lb corn frozen kernels or 3 cups of fresh yellow corn
3 Persian cucumbers, diced
1 bunch green onions, chopped
1 cup roasted red bell pepper, diced
1 cup feta cheese, crumbled
pepperoncini, finely minced
generous amount of zest of 1 lemon

Greek Vinaigrette

1/2 cup olive oil
2 T red wine vinegar
1-2 cloves garlic, minced 
1 T Dijon mustard
Juice and zest of 1 lemon 
1 t. oregano
Salt and pepper (to taste)

Prepare quinoa according to package directions. I used chicken broth but you can substitute with water or vegetable broth. 
Prepare vegetables. I used frozen corn to add to the hot quinoa to quicken the cooling process, but you can use corn cut from the cob once the quinoa is cooled. Add veggies, cheese and dressing and mix. Refrigerate for an hour or overnight. Add additional dressing if needed. 
Other summer recipes to try:
Quinoa Spring Rolls
Pineapple Chicken


Corn, Tomato and Basil Salad